
Hints & Tips
Welcome to the Hints & Tips page. Here you will be able to find useful information and ideas on using our light kits with you model building projects.
Hints & Tips On Light Kit Installation And Effects
Our light kits are used in many different models and applications, and so it's impossible to provide model-specific fitting instructions. Much is left to the model makers discretion based on the lighting effect that is required, and the practical applications of the model eg does the kit need to be removable, will the model be exposed to impact as with RC vehicles or is it static display etc. The following is a list of general guidelines for basic fitting of the kits, and a few basic effects that can be attained.
1) Choice of kit
Choose the most appropriate kit size for your model, based on led size and loom size. We have many standard kits to choose from, but can make these to the specific dimensions of your model on request. Think about where the battery or power lead for the set will be located (or receiver unit if operated from radio gear), and ensure there will be enough wire length on the led kit that you order to allow easy routing through the model.
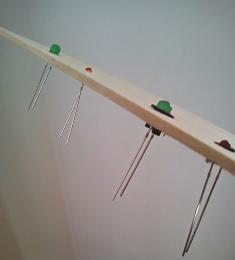
2) Fitting round type LEDs
The most common round LEDs we supply are 3mm, 5mm and 10mm diameters. Some sets include fitting clips to allow a more secure fit and allow the LEDs to be removable. These are commonly fitted by marking on the model where the LED needs to be installed and drilling a small hole through the models body shell. I tend to drill between 0.5 and 1mm smaller than the led diameter to allow a tighter fit for the led and the clip. It's much easier to start out with a smaller fitting hole and widen it out gradually with the drill or needle file, rather than make the hole too big to start with. In this way, LEDs can be fitted both with and without fitting clips. LEDs that are permanently fitted can be carefully glued in place.
3) Fitting strip SMD leds
Very straightforward - simply peel back the 3M backing tape and affix to a clean and dry surface. These LEDs have more uses than you would expect if you think a bit "outside the box" when planning the lighting effects. Commonly used in Scalextric track lighting, I use these in various display models, eg the Star Wars type, to flood large areas with light. If you have a detailed model spacecraft with lots of portholes to drill and illuminate, it can get very time consuming (and costly) to illuminate them with fibre optic. I've seen many "professionally built" models resembling something nearer a hedgehog than a spacecraft, littered with poorly fitting fibres sticking out of porthole windows. Ironically, more often than not, these are light kits that have cost in excess of £100 from other companies, and were in kit form themselves.
An easy solution is to spray paint the inside of the model shell with several coats of dark paint before drilling out the numerous windows with a fine drill. You can place a number of led strips, eg warm white, inside the shell, angled in a way to flood the area with light. Clear acetate strips (laminate sheets are cheap and effective - the old classic is to use plastic milk cartons) can be used as glazing on the inside of the shell if required.
4) Working with fibre optics
Fibre optics are very popular for detailed display models. Again, think about the length of fibre cable that you need for the area to be lit, and ensure it's long enough to also allow placement of the light-source LED.
When you are routing fibre optics through the model, bend the fibre slowly and gently to avoid kinking or snapping it. Fibre optic is quite versatile, but smaller diameter fibre can snap easily if handled too roughly on fitting. The key to all good quality model making is to take your time.
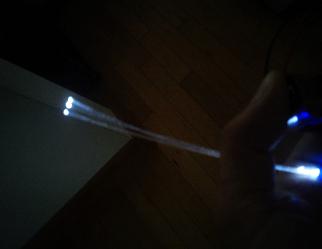
All of our fibres are dispatched as "end glow" in that they emit the light mainly from the end of the fibre. Fibres can be cut to size using a sharp pair of scissors. Try to make as clean a 90 degree cut as possible. For best results, polish the end of the cut fibre with very fine wet & dry paper.
You can obtain different effects by "notching" the fibre at various points along its length with a Stanley knife blade. This allows light to bleed from the fibre at specific points. Lightly tap the Stanley blade at points along the fibre where this is required. Where the full length of the fibre may be required to glow, for example with our Tie Fighter red optic cockpit lighting, you need to notch the fibre fully as shown below. Simply put, it's like dicing carrots very quickly, with the weight of the knife itself being enough force to apply. It doesn't take nearly half as long as you would think to achieve this effect. Formed fibre can then be super-glued in place within the model, ensuring the notched side of the fibre is shining in the direction required.
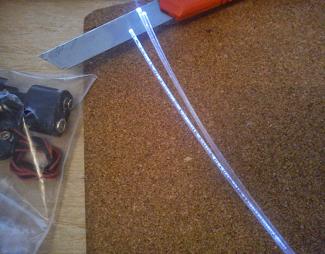
We use the best quality 1mm diameter fibre for our light kits unless otherwise stated, as this gives the best light output and maximum fibre flexibility.
To install, use a 1mm drill to make the fitting hole. Push the fibre strand through slightly further than required. Affix using glue (I use standard superglue) on the unseen part of the fibre, then when it is dry, trim off the excess with scissors or a sharp knife for a precise finish.
5) Blending light
More so for decorative display models and diaramas, different lighting effects can be created by grouping different colour LEDs together, and possibly angling them in different directions when fitting. Gothic themes can make use of ultra violets, blues, greens and yellows for example. If you don't want very bright lighting on the model, diffused LEDs (which give out a softer more even glow) may be a better choice. If you are unsure on colour themes, contact us and we'll provide as many different ideas as possible to get the effect that you're after.
6) Ask
We don't charge for help or advice (there are model lighting companies out there who will charge you £1 just to read your email, believe it or not), so don't be afraid to ask us if you're stuck with any aspect of model lighting. If we don't know the answer ourselves, we won't guess - we may be able to put you in contact with a person who does have the solution. We work alongside many professional model builders and reputable model businesses, so in most cases we can help straight away. Please allow us 24 hours to respond to your enquiry, possibly up to 48 hours at busier times of the year eg Christmas.